Wednesday, October 12, 2011

What should I do with this?

We got a new TV a couple of weeks ago (of course, with everything else that comes with it). We needed a TV stand...the old one we had was a space-age-y corner stand that served its purpose well, but I wasn't crazy about the look. For our new TV I wanted to try out something new, so I started scouring Craigslist for dressers or buffets to use as a media stand.

I came across this post:
image 0
...and I thought - that could work. It would fit our space, it's the height we want, and we could remove the top drawer and one of the lower drawers for tv accessories that have to be in the open (mainly the sound bar and the cable box). Well, when we went to take a look at it at the seller's house, they had a slightly smaller yet similar item that wouldn't require nearly as much effort for our purposes (FYI - the original item above is still available! See the post here).

We ended up taking this puppy home:
This is all set up in our house - as you can see, the soundbar fits PERFECTLY in the top shelf, and the cable box and DVD fit perfectly in the other shelves. In a perfect world it would be slightly wider, but the depth of this piece works perfect for our space.

So now here comes the question - to paint or not to paint? The piece needs to be refinished at some point because it has a few scratches and marks on the finish. Should we stick with a stain to keep the warmth of the piece (and tie into our staircase), or should we paint - in which case, light or dark?

Opinions welcome!


Monday, October 10, 2011

Happy Thanksgiving - Just call me Martha

Hello friends! What a beautiful Thanksgiving weekend this was...highs near the 30's and pure sun - couldn't ask for better weather.

We hosted Thanksgiving dinner at our place this year for the first time! We had a few friends over since our families are in Ottawa and we didn't make the trip back.

I litterally felt like Martha Stewart - cook cook cook, clean, cook! I definitely think we succeeded in our first Thanksgiving feast (even made turkey soup today!).  Here's my weekend in food:
Stuffing is probably my favourite thing about turkey dinner...the Mr. was worried we wouldn't have enough bread but I think once it was cut we both saw the huge amount we had to work with!

Yes, I still put the stuffing IN the turkey. In my mind it's the only way. (PS - we had the PERFECT amount of stuffing for the 7kg turkey we had!)

All cooked up! YUMM

I made the pumpkin pie on Saturday night to save time. I am not sure what caused the crack in the middle (slightly over cooked??) but it tasted delicious. Our guests brought 2 pies from Yitz's deli here in Toronto and they were top notch!

Remember how I posted on Saturday about how to decorate your table for Thanksgiving? Well, as I was setting my table, it dawned on me how much room you have to leave for the good stuff - aka food. So, I kept it really simple with some tall candleholders and gourds:


The dinner was very fun, and delicious! Everything went really well and we were happy to have such great company for our first hosted Thanksgiving dinner. To top off the weekend, I made cinnamon buns for this morning:

This is how they look out of the oven...then you flip them over and you get:


Yummy.

Just to clarify, we hit the gym on Sunday morning and went for a long bike ride today in the Don Valley- definitely had to be active with all that food!

Hope all of you in Canada had a nice weekend! FYI...my posting might be a bit light this week, it's a short week so bound to be busy at work and I'm out of the office on training Thursday and Friday. Have a good week everyone!

Saturday, October 8, 2011

Table decor for your turkey

Happy Thanksgiving for all my Canadian friends!! It is a GORGEOUS weekend here, and definitely warmer than normal for Thanksgiving (NO complaints here).

We are having some friends over for Thanksgiving dinner tomorrow, and it will be our first turkey cooking experience! Wish us luck...I'm thinking I should make the table look pretty so even if the food doesn't turn out perfectly at least people will be distracted by nice decor? (and wine, lots of wine).

Style at Home has pulled through again with some great ideas for Thanksgiving table decor. Here are some of my faves:
thanks-napkin-rings.jpg
thanks-table-run.jpg
I won't be going as far as having my guests sit on hay bales, but gourds in vases is definitely a simple possibility - via


And some more inspiration:
Pinned Image
thanksgiving-table-002
I hope we will have too much food on the table to do this one...but like the look of it! via Covetabledesigns
This looks dead simple (aka right up my alley...) - via On a Whim and a Broomstick

Friday, October 7, 2011

Friday faves - feeling pampered

I have spent the last 5 nights at my parents' house...I came to Ottawa last weekend for a wedding (a beautiful, beautiful wedding!) and stayed for work until Thursday night. I have to say...being here during the week was quite a bit like being at a resort. When I got home I had nothing to think about - didn't have to come up with ideas for dinner, didn't have to think about home projects, and didn't have to do any chores. Amazing (thanks mom!).

In honour of this resort-type atmosphere, for today's Friday Faves I'm sharing some seriously luxurious hotel spots around the world (unfortunately I haven't had the chance to frequent these yet, but let's add them to the list, shall we?).

Happy daydreaming...

The Waikiki Edition, Hawaii - via EnRoute
 Sentosa Resort & Spa, Singapore - via

Sovena Kiri Six Senses, Thailand - via
The Old Bank Hotel - Oxford UK via
Taylor Hotel, Paris - via
The Nines (Luxury Collection), Portland - via
The Outpost Kruger National Park, South Africa - via 

Ok, so this isn't a hotel - however it is on an AIRPLANE. Just think of how lovely it would be to have a "seat" like this on a long overseas flight...ahhhh..... Singapore Airlines via


Tuesday, October 4, 2011

Porch project - floor

As the final leg of our porch project (you can read more about that here, here and here) the Mr. painted our porch floor. What was supposed to be a really simple project turned into about 5 trips to Home Depot (seriously, can anyone do a home project with just ONE trip there!??!). The main problem was the colour of the first paint we got, it was way too light...we would have been blinded every time we walked up to our house. So, we took the paint back and they actually just fully exchanged it for a new can (amazing), and then we had to go to another Home Depot to get more "sand" to put in the paint (anti-slip medium).  Long story short, the floor is painted and now we're on the hunt for some more comfy chairs for the porch. If anyone knows anywhere doing patio furniture clearance let us know :)

Not the sexiest of projects, but one you just gotta do :)


Monday, October 3, 2011

Getting crafty with a salad spinner?

Last week I was home one day nursing a very annoying cough and cold. The good part was that I got to catch up on some fun daytime TV! I definitely soaked in CityLine, some OWN Season 25 and some great cooking shows (I can never seem to catch them in a normal week when I don't get home before 6:30). All in all a great day, despite a coughing fit in the middle of a teleconference (had to do SOME work...embarrassing that I was coughing so much I couldn't talk and no one on the line knew what was going on? yes...) Anyhoo...I decided to watch the Marilyn Denis show because I loved her when she used to be on CityLine.

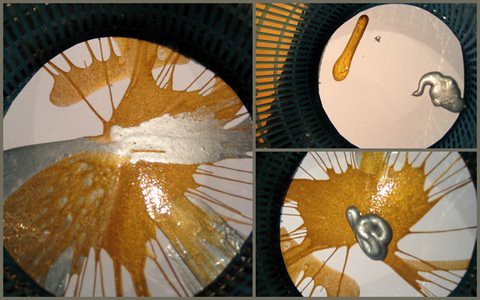
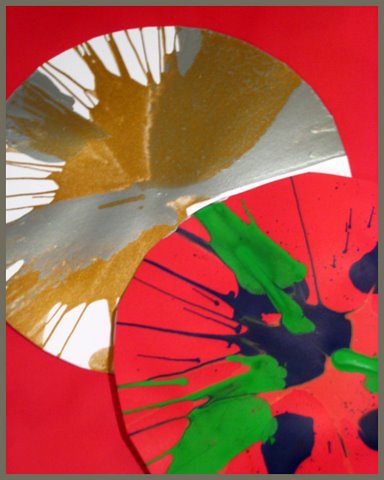
One of her segments was on art...specifically, art made with a salad spinner. Yes, you heard right! So, for all you crafty folks out there, get your art on. Here are some examples:
salad spinner art
homemade gift tags

Marilyn's segment focused primarily on black and white final products, which looked really sharp. I think this could look chic if you stick to a specific colour palette. If you have kids (or just love crafts) and have an old salad spinner, give this wacky art a try!

Here is the how-to from the Marilyn Denis show:
Step #1: Cut paper in a circle to fit inside the salad spinner
Step #2: Splatter various colours of paint on the paper
Step #3: Put the lid on the spinner and spin!
Step #4: When it's stopped spinning take lid off, add more paint if you'd like a different pattern. Otherwise, allow to dry for a few hours and frame.

Simple isn't it?? 
Related Posts Plugin for WordPress, Blogger...