Showing posts with label dining room. Show all posts

Thursday, August 8, 2013

Flooring is IN!

Wednesday was flooring install day - and it all got installed!

Woot!


Pretttaay exciting.

The first and last photos are most true to the colour...having them installed make all the work associated with demo disappear (we still have to clean up the basement though...) Now that the floor is in, we have to put in baseboards, do tiling for the kitchen and closet, and drywall / casing for our newly opened up hallway, but we're getting there. We will hire someone for the remainder of the work because the tiling will be finicky due to the radiators, and we want the baseboards and casing / drywall done right...now just to find said handy-person who can be available, at a reasonable cost, and done in early September...

Tuesday, August 6, 2013

Progress: Project Flooring

Another month, another blog post. I thought that I would have an easier time blogging of late, but life is just very busy. I'm working away at my day job and unfortunately that means that "free time" at night is spent on projects for the house, regular day to day chores, and sleeping. Oh, and some planning for the little human that will be joining us in the coming months. Until then....

Things are happening on the flooring front!! As part of our 2013 goals one of the longshots was re-doing flooring at least on the main floor. Why not do it when I'm 8 months pregnant? ;) Better than post baby, that I know FOR SURE. If you follow me on Instagram or Twitter you know some of the progress that was made this weekend (if you don't follow me, then you should, I am able to update those easier than updating the ol blog!).

All weekend the Mr worked away on the project (help from friends for demo day was greatly appreciated). My specialty was doing puzzles with plywood  measurements to ensure we got the most our of each sheet!

Here is the demo:


The living room and dining room demo was "easy" according to the guys - the trouble came in the hallway where there was hardwood on top of linoleum on top of plywood on top of another linoleum on top of plywood on top of floor planks. Yikes (they didn't get a chance to take a photo of that beauty).

The second demo photo shows some of the debris and mess caused by demo...which all fell through the floor plank cracks into our basement onto this:

Thank god I had some foresight and threw plastic over the china/crystal and a drop cloth over the dining chairs on Saturday morning before demo started. We still have a hell of a mess to clean up in and over other things, but at least some of it was spared and I don't think there is any damage (fingers crossed....). The day didn't finish without any damage though...the Mr. had to get a couple of stitches after getting caught in the face with a plank / nail during demo! He's OK and stitched up following a 3 hour wait at the hospital on Saturday night (I plucked some of the many many nails from the floor while he was getting stitched up...he pushed through the rest of the day so he could finish the demo before going to the hospital!).

Day 2 was picking up the plywood from our friends at Home Depot:
 Yes, I did get to drive that puppy around and it was great. The rest of the day was the Mr. and I pulling out some more nails, measuring, cutting, and laying plywood.


Monday was spent screwing in the plywood and doing some final measurements and cuts. It's amazing how much better it looks already!

If you have seen my house tour, you know that on our main floor we had the hallway blocked off with drywall and beatiful 80's glass blocks. We covered up this side of it with a dresser and mirror, and while that was nice for extra storage we are liking the airy feel of the house opened up, so I think we're going to keep the hallway!

Hardwood installers come later this week...can't wait to see it all done! We will be tiling the entry way and the kitchen with a dark gray tile...more on that to come (anyone know a good tiler / baseboard installer who isn't crazy busy into September??)

Wednesday, November 2, 2011

DIY bar cabinet

This weekend was a productive one - along with Halloween prep and festivities, a visit to Waterloo, and a bunch of running around - we managed to get some projects done!

Remember this cabinet I found on the curb in the summer?
You can read about the find and some of my initial inspiration here.

Here's what we did with it:


I removed all the existing hardware / decorative hardware, and then mixed a custom colour of paint from a few that I had lying around and a deep gray I got from the Habitat for Humanity Restore, aiming for a light gray colour. The Mr. cut out part of the cabinet front so we could use some extra wire mesh from our rad cover project. I distressed the cabinet by lightly sanding random areas of it, and the knobs were Anthro finds from our September Chicago trip! Here are some more photos and my attempts at styling:


Thursday, May 26, 2011

Table topper - groupie style

Remember my inspiration post on what to do with a couple of linen rable runners I bought a few weeks ago?  I took a little sidetrip to HomeSense the other day and found some great pieces to use with the runners.

Although I didn't find a tablecloth I liked enough to buy, I did find some great patterned napkins and lovely napkin rings:


(ignore the creases...it obviously needs to be washed and ironed...)
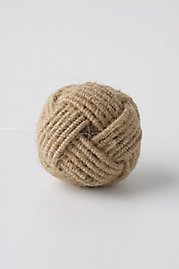
Napkin ring - doesn't this remind you of the Anthro pull below? I LOVED these pulls but they didn't fit with any refinishing projects I was working on at the time...

I like this non-tablecloth option for summer because it lets me show off my table. I only got 4 napkins and 4 napkin rings (couldn't find any more rings). Since I got them home I've been wondering if I should have gotten 4 more napkins? I can always mix and match the napkin rings (or not use them) if we have more than 4 people for dinner. I'm thinking I should have 8 napkins though - whether it's to have extras on hand, or for when we have more than 4 people. Thoughts?

Monday, May 23, 2011

Table topper

A few weeks ago I attended Kimberley Seldon's Designer Market at the Distillery District here in Toronto. Although not that impressed with the full event, I did find 2 neutral linen table runners for our dining room.  To liven things up a bit I want to layer the look, or add a pop with other table accessories. Here are some of my inspiration pics:

This would be pretty as a runner over my runners...via Crafts Cool


Tuesday, March 8, 2011

Rad Covers - Complete!

This weekend marked the end of our (initial) rad cover project! You can see Part 1 here. It was finally warm enough that we could spray paint the metal grates outside in the garage. It was VERY wet/humid but the paint seemed to dry just fine (thank god...we couldn't bear waiting much longer to get these up!). 

The perforated metal was the hardest component to find at a good price. For those of you in Toronto, we ended up getting the metal at FerrierWire. They had the best price and did custom cuts (for just a bit extra). Let me tell you, that "extra" was well worth it.  We ended up paying $150 for all the metal we needed for the living room and dining room covers and having it custom cut (as opposed to $160 for just the metal, uncut from our first source). Their pieces are $113 for a 3'x8' piece (Rona sells pieces 3'x2' for $40 if you're looking for something smaller, and Danforth Lumber sells 3'x4' for $80. Neither cuts to size). The only potential downside is that Ferrier is only open Mon-Fri, 8am-3pm-ish, but we made it work.

We used MDF for the box and top, with some trim for the edges. 

Here's the stuff you've been waiting for - the before and afters:
This was our entry rad "during" the project, as posted in Rad Covers -Part 1

And...after!!
For this rad we used a wooden screen that we had hanging out in the garage so this was one of the first ones done.

Here is what our rads looked like before our project:


Now do you see why we were so keen on getting this project done?

Rad cover box, pre-screen


Attaching the screen was pretty easy - just a small screw that it can rest on when gravity does its thing.

And the final product... 
Ta-da!!


It's funny how such weird, seemingly background-ish projects can make such a huge difference. Now we're hooked and will likely do some for our bedrooms upstairs - it just looks SO much better!

Monday, January 24, 2011

Cabinet aesthetics

I have a white china cabinet in the kitchen and I need something in there to liven things up a bit. I would like to add another shelf above the plates (aka the big empty spot on the right) but can't find little pegs that fit the holes (believe it or not!). 

Here is our cabinet:
I would like to wallpaper the inside of the cabinet to add some life - here are some inspiration photos:
Doesn't that look great? And the cabinet is almost identical to mine, save the middle separation on mine. 


via Artessen

Now just to find the wallpaper and a free weekend to complete the project!

Related Posts Plugin for WordPress, Blogger...