Showing posts with label fabric. Show all posts

Tuesday, June 17, 2014

Coffee table conundrum - SOLVED!

Exciting news, my friends. I FOUND a coffee table this weekend. One that will work and replace our old rickety one!

The funniest part of it is that I litterally found it...in my basement...


I've had it for the last couple of years (at least...) and when we originally got it I had planned to turn it into a bench for our guest room like the one I made for our master)...but then we redid our bathroom and stole 20" from the guest room...which wouldn't leave enough room for a bench. At the time I didn't think the table would work as a coffee table because it didn't have storage / a shelf. However...since Owen has started motoring around, pawing at everything, and deciding his favourite toy is anything that is NOT a toy, I've realized (and thanks to your comments on this post) that I won't be able to store things out in the open much longer anyways.

So, the plan is to get some foam, some batting, and some fabric and upholster it ASAP. A few comments said not to have an upholstered coffee table if we like putting our feet up on it...we do, but I'm not too worried about the fabric - if it gets grimy (which I'm sure it will with Owen pawing it every day), we can just recover it in a year.

I went to Tonic Living today and picked out some fabric samples - here are some contenders:

Outdoor+-+Secret+Gate,+Pewter 
Secret Gate - Pewter from Tonic Living

Outdoor+-+A+New+Twist,+Caviar

A New Twist - Caviar from Tonic Living

Outdoor+-+Centro,+Mist
Centro - Mist from Tonic Living

Leda Peony, Midnight

Leda Peony - Midnight from Tonic Living

Any favourites? I know which one is leading the way for me...


Monday, November 18, 2013

DIY No Sew Roman Shade

I hope you all had a good weekend - weekends have taken on a new form since the little guy showed up - gone are the weekends of epic errands/running around and projects, and now we have leisurely, relaxing, weekends with walks, playing, and cooing. Kind of cool :)

I do have another DIY project from the nursery to feature - my no sew Roman shade!

The roman shade was meant to be a simple DIY no sew project…I started it before Owen was born and my mom had to finish it! It was still pretty much no sew, but took a while to figure out the placement of the pleats and how to maneuvre the whole blind.  I wanted the shade to be functional to offer light control, but a lot of the tutorials I found involved mini blinds on the back and to be honest it was all just a bit too involved. I finally found what I wanted andused this Thrifty Décor Chick tutorial as our main guide. 

Since this window is right next to our neighbour’s window, I wanted to keep the slat blinds for privacy while still letting light in. This meant that I couldn't mount the roman shade within the casing, which would have been easy peasy. Instead we added a small block of wood to the top of the window frame and used a tension rod between that and the wall to hold the roman shade.

I wanted the shade to be blackout to darken the room for Owen’s naps and (hopefully) early bedtime when he’s a bit older. I didn't have the patience to wade through a bunch of fabric looking for the right price so I bought a white table cloth at Homesense, and some navy ribbon from Fabricland to get the look I wanted. I cut the fabric to size and added blackout lining with hemming tape. This was the part that I did...

Then the challenge of how to make the shade WORK. The tutorial uses eye hooks for ribbon, but I wanted everything on the blind itself. To allow the blind to be raised and lowered easily, my mom sewed 1 button on each side of the back of the blind, and then added ribbon (ribbon lengths get longer as you go down the blind) at three points to be our gathers.
 
When the ribbons are hooked over the button, you get the casual roman shade pleats, and it makes it easy to put the shade up and down. And finally, my mom added the lengths of ribbon using heming tape to adhere to the shade.

I’m really happy with how it turned out, but I definitely couldn’t have done it on my own (preggo brain / new mom brain did not make it an easy project! Aren't mom's the best??). Stay tuned for a full nursery reveal later this week...

Tuesday, November 12, 2013

DIY Nursery Fabric Art

I'm finally getting around to posting about nursery projects! I completed a few while I was off before Owen arrived, and my mom was a huge help with a number of projects (to be revealed)...

With the nursery we decided to keep the paint colour that we had on the walls - it's a gray-sage green (I could look up the Benjamin Moore colour...but I'm not...), and we thought it would work for a boy or a girl (babygroupie was a surprise for us!). That cut down on some of the baby room prep, and to keep it gender neutral, I decided on a navy and coral colour scheme. To add some interest to the walls I did a simple DIY art project - it's all over pinterest / blog land and is the easiest craft ever.

Start with wooden rings that you can get at any fabric store - i lucked into a buy one get one 50% off at Fabricland, so I picked up a number of rings in different sizes.
From there, cut your fabric to size for the loop you are filling. Tighten the wooden loop over the fabric, and trim the excess fabric.

To lay the art out on the wall, I cut out circles in newsprint and taped them up until I was happy with the arrangement.

And voila! DIY nursery art that adds a pop of colour (and catches the little guy's eye!)

Wednesday, March 13, 2013

Pillow patterns

Ok...I have seen a bunch of pillow posts lately. Which kind of makes me feel mega-late on my pillow ideas / living room facelift. I've come to the conclusion that the green is out, and navy will be in. I want to do a mix of grey and navy, and then hopefully if the pillow gods are in my favor, this puppy for our gorgeously re-upholstered gray herringbone chair:
via Chapters Indigo, brought to my attenion by the lovely Sundeep at DesignWali
 
Here's a reminder of my sofa and living room:
 
Yep, I'm so over the green and brown ikat, and green pillows (I have 2 of the same on the other side of the sofa).

I've got 4 pillows to re-do (2 16" and 2 18"), and am thinking of navy and gray. ahhhh I LOVE navy right now (well pretty much always...but especially right now, and especially in my living room).  Here are some of my options:
Cameron Storm, via TonicLiving

Small ikat dot navy (also in gray) via Tonic Living

Zia birch navy (also available in charcoal), via TonicLiving

Right now I'm thinking 2 of the gray ones in 18" and one of each (16") of the navy ones. 
Please excuse (aka stop laughing) at my lame-o attempt at a rendering. Oh, and our ghetto coffee table (still on the lookout...anyone know places in Toronto that will sell slabs of wood?)

What do you think? More navy, less grey? All 4 differernt (e.g. maybe one of the big ones in a gray version of one of the navys?)

Monday, January 21, 2013

Living room chair - after!

I hope you all had a great weekend...mine was pretty relaxing with a big highlight: we picked up our re-upholstered chair this weekend...and it looks AMAZING! I wanted to wait to post it until I had the right pillow for it (remember I posted this gorgeous one? Yah, still can't justify that cost), but I just can't wait to post it. It is gorgeous.

If you remember, we nabbed this chair off Craigslist:
 
I commissioned the lovely Lindsey from Recreated to re-do the chair for me. She moonlights in reupholstery at Re:Style Studio and did a wonderful job on our chair...here's the finished product:
Fabulous, non?

Here are some more shots of the details:
That double piping around the foot is perfection...

 more amazing double piping details...so nice...


Isn't it handsome?

Sources:
Chair: craigslist
Re-Upholstery: Lindsey from Recreated
Fabric: Eurofab

Wednesday, October 3, 2012

Curb find stools -DIY'd and finished!

I know, I KNOW. These stools took me forever to finish...between chosing fabric, spray paint blunders, and any other excuse I could come up with they took a llllooonnngggg time (read: all summer) to get to a point where I could show them.

But. They are ready.

I can say that they've been done and displayed for a little while now, but I've only recently found / made the time to write about them.

Say helloooo to the new stools:

These will act as extra seating whenever we need it, and potentially as side tables without the cushions if needed.

Thanks to my amazing mom who made the round cushions - no easy feat. And, to beat that? She took pictures of the process. See, I told you she was amazing.
 And to recap....
Don't you think with the black spray paint they look a lot like this puppy:

Except the PB one retails for $192.98 each ... without a cushion.

Tuesday, September 11, 2012

DIY fabric covered tray

Today I'm keeping it light, but definitely remembering 9/11. My thoughts go out to all who were affected or suffered loss that day.

Onto the lighter side....

All summer the Mr. and I lamented about needing a tray to carry dishes outside for eating al-fresco. I finally found one at the end of August that needed a little face lift.
It was filthy...so I did a good clean on it and then started to remove the old shelving paper that was lining it.

Fortunately it peeled off pretty easily.

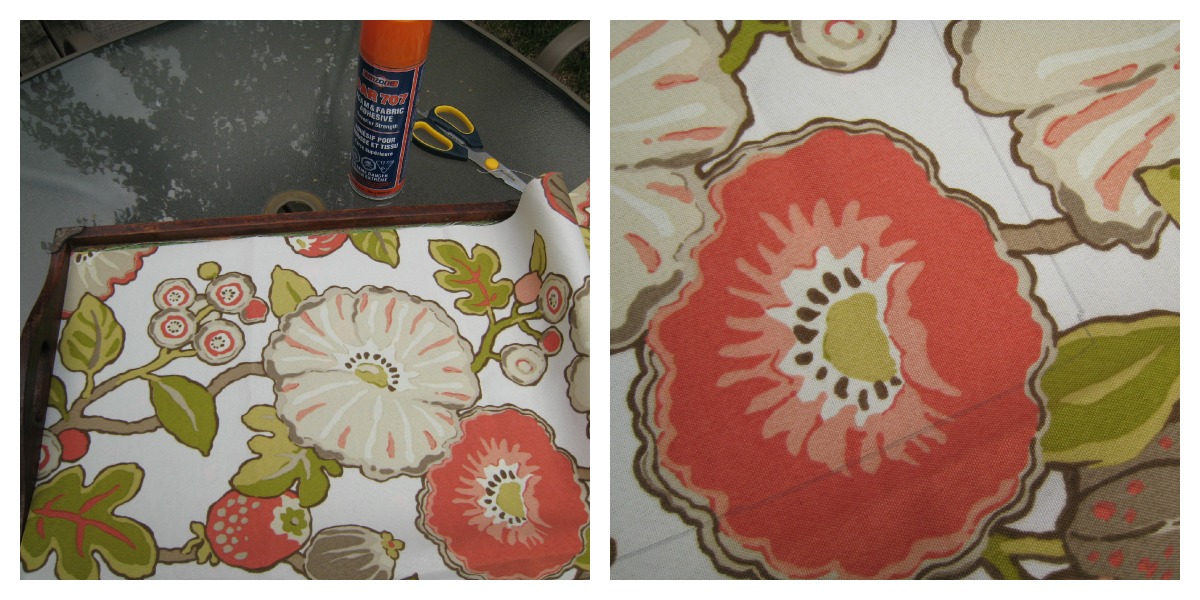
I decided I didn't want to paint the tray (been there, done that) so I thought I would line it with fabric. Initially I thought I would cover it so we could wipe it down, but the Mr. said we shouldn't really need to do that since we'll be using it primarily for dishes before / after eating, not for actual food. Good point.

I broke out some extra fabric I had from our master bedroom bench. it's durable since it's outdoor fabric which is a bonus. I laid it over the tray to measure, and traced the inside of the tray with pencil.
I cut out the fabric and sprayed the back with spray-adhesive, set it on the tray and pushed out any creases / bubbles (sort of like putting on a new iPhone cover...but wayyyyyy easier).

It's hard to tell from this photo, but the edges weren't great since I just cut the fabric and didn't hem it. The fabric was fraying a bit and not perfectly square with the tray. So I decided to add some ribbon to finish the edges off.

Thursday, July 26, 2012

Impressive new collection: IKEA NÄTVIDE

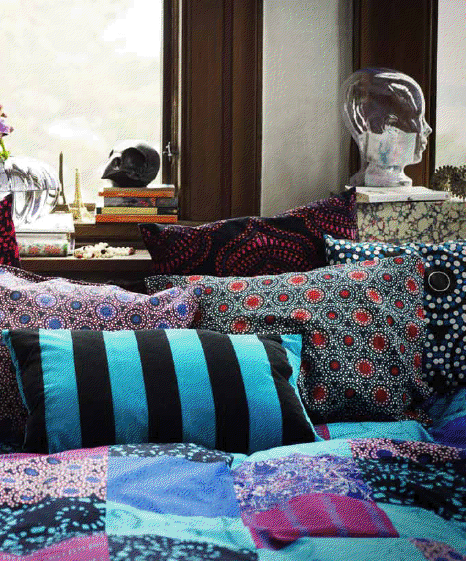
Ikea is introducing a limited edition collection of gorgeous textiles, and it is totally loveable (NÄTVIDE, designed by Anna Efverlund and Maria Vinka)

I adore the "global" inspiration for this collection, and with Ikea you know that everything is at an amazing price point. I'm looking forward to getting to the store to check it out (and hoping it's not as crazy as H&M capsule collections)...but you'll have to "start the car" to get there - it comes out August 1 and only lasts as long as they can keep the shelves stocked.


This is one of my favourites:

This bedding is bold but a lot of fun - duvet cover and pillow cases, starting from $19.99


The cushion on the right is my FAVE...cushions starting at $14.99

How do you like them apples? I love how this is a departure from the typical Ikea style, and can see this being used in a bedroom with a bold theme, as accents in a living room or outdoors on the patio. Love it!

All photos courtesy of Ikea Canada

Tuesday, July 24, 2012

Curb-find-stools - during

Remember these curb-side stools that I found? (PS the blog date doesn't lie...these were found back in March...seems like I've dropped the ball on that one...woops!)


After hemming and hawing about some fabric options here and here, I ended up ordering some from Hodi and Poppi Fabrics on Etsy. My mom worked her wonders on the sewing machine and whipped up some cushions for these stools (and she even took photos as she went, which will be included in a future post. What a wonderful blogger mom she is!!). Here's a quick sneak peak:


Next step is some spray paint for the base and then you'll get to see the full goodness in action! Patience is a virtue they say... 


Thursday, May 24, 2012

Fabric fashion for my stools

On the weekend I headed over to Designer Fabrics to pick up some fabric samples for the stools I found on the curb a little while ago. When I did my initial post all you readers loved the navy and white ikat dot print, so I found one similar and a few other options.

Here are the plain stools (the plan is to add a cushion to the top - i would like to use them for extra seating outside in the summer, and potentially inside beyond that):
this version of the blue ikat dot is quilted...which isn't really floating my boat

neutral linear choices


The pillow in this photo is on my couch, along with green pillows. So, if I wanted to move these indoors I would like them to coordinate with this. Looking at it together, is it too many circles if I go with the blue ikat dots? I think I like the linear look of the neutral chevron on the right side. BUT I want something a bit punchier since these will be used outdoors as well.

Am I hoping for too much from one little cushion? haha Should I have one set for outside and one for inside? I like the look of the navy in the room, but I think maybe something striped or chevron would be the way to go.

Help? What do you think?

Related Posts Plugin for WordPress, Blogger...